 PluBIM Help

LevelGuard
Check whether MEP elements reference the right level and their height tags match.
- Ribbon group
- Quality
- Version
- PluBIM 1.5.0
LevelGuard compares pipes, ducts, cable trays and conduits with the floors and roofs of the linked architectural model. In 1 · Reference levels it shows which elements should be moved to a different level. In 2 · Tag types it checks whether the height tags in the view match the element.
When to use it
| You want to … | How |
|---|---|
| Use LevelGuard in a project for the first time | Set up the project settings |
| Check whether the MEP elements reference the right level, e.g. before issuing drawings or after changes to floors and levels | Check in Simple mode |
| Also see whether all required levels are defined | Check in Detailed mode, see Simple or Detailed? |
| Find wrong, missing or duplicate height tags | Check height tags |
Requirements
- A floor plan is the active view.
- The Levels category has the project parameters MP_400_Referenztyp (Text) and MP_400_Beschriftungsebene (Yes/No). If one is missing, LevelGuard reports Level parameter missing.
- The levels elements may reference are active in the project settings and have a reference type.
The LevelGuard window
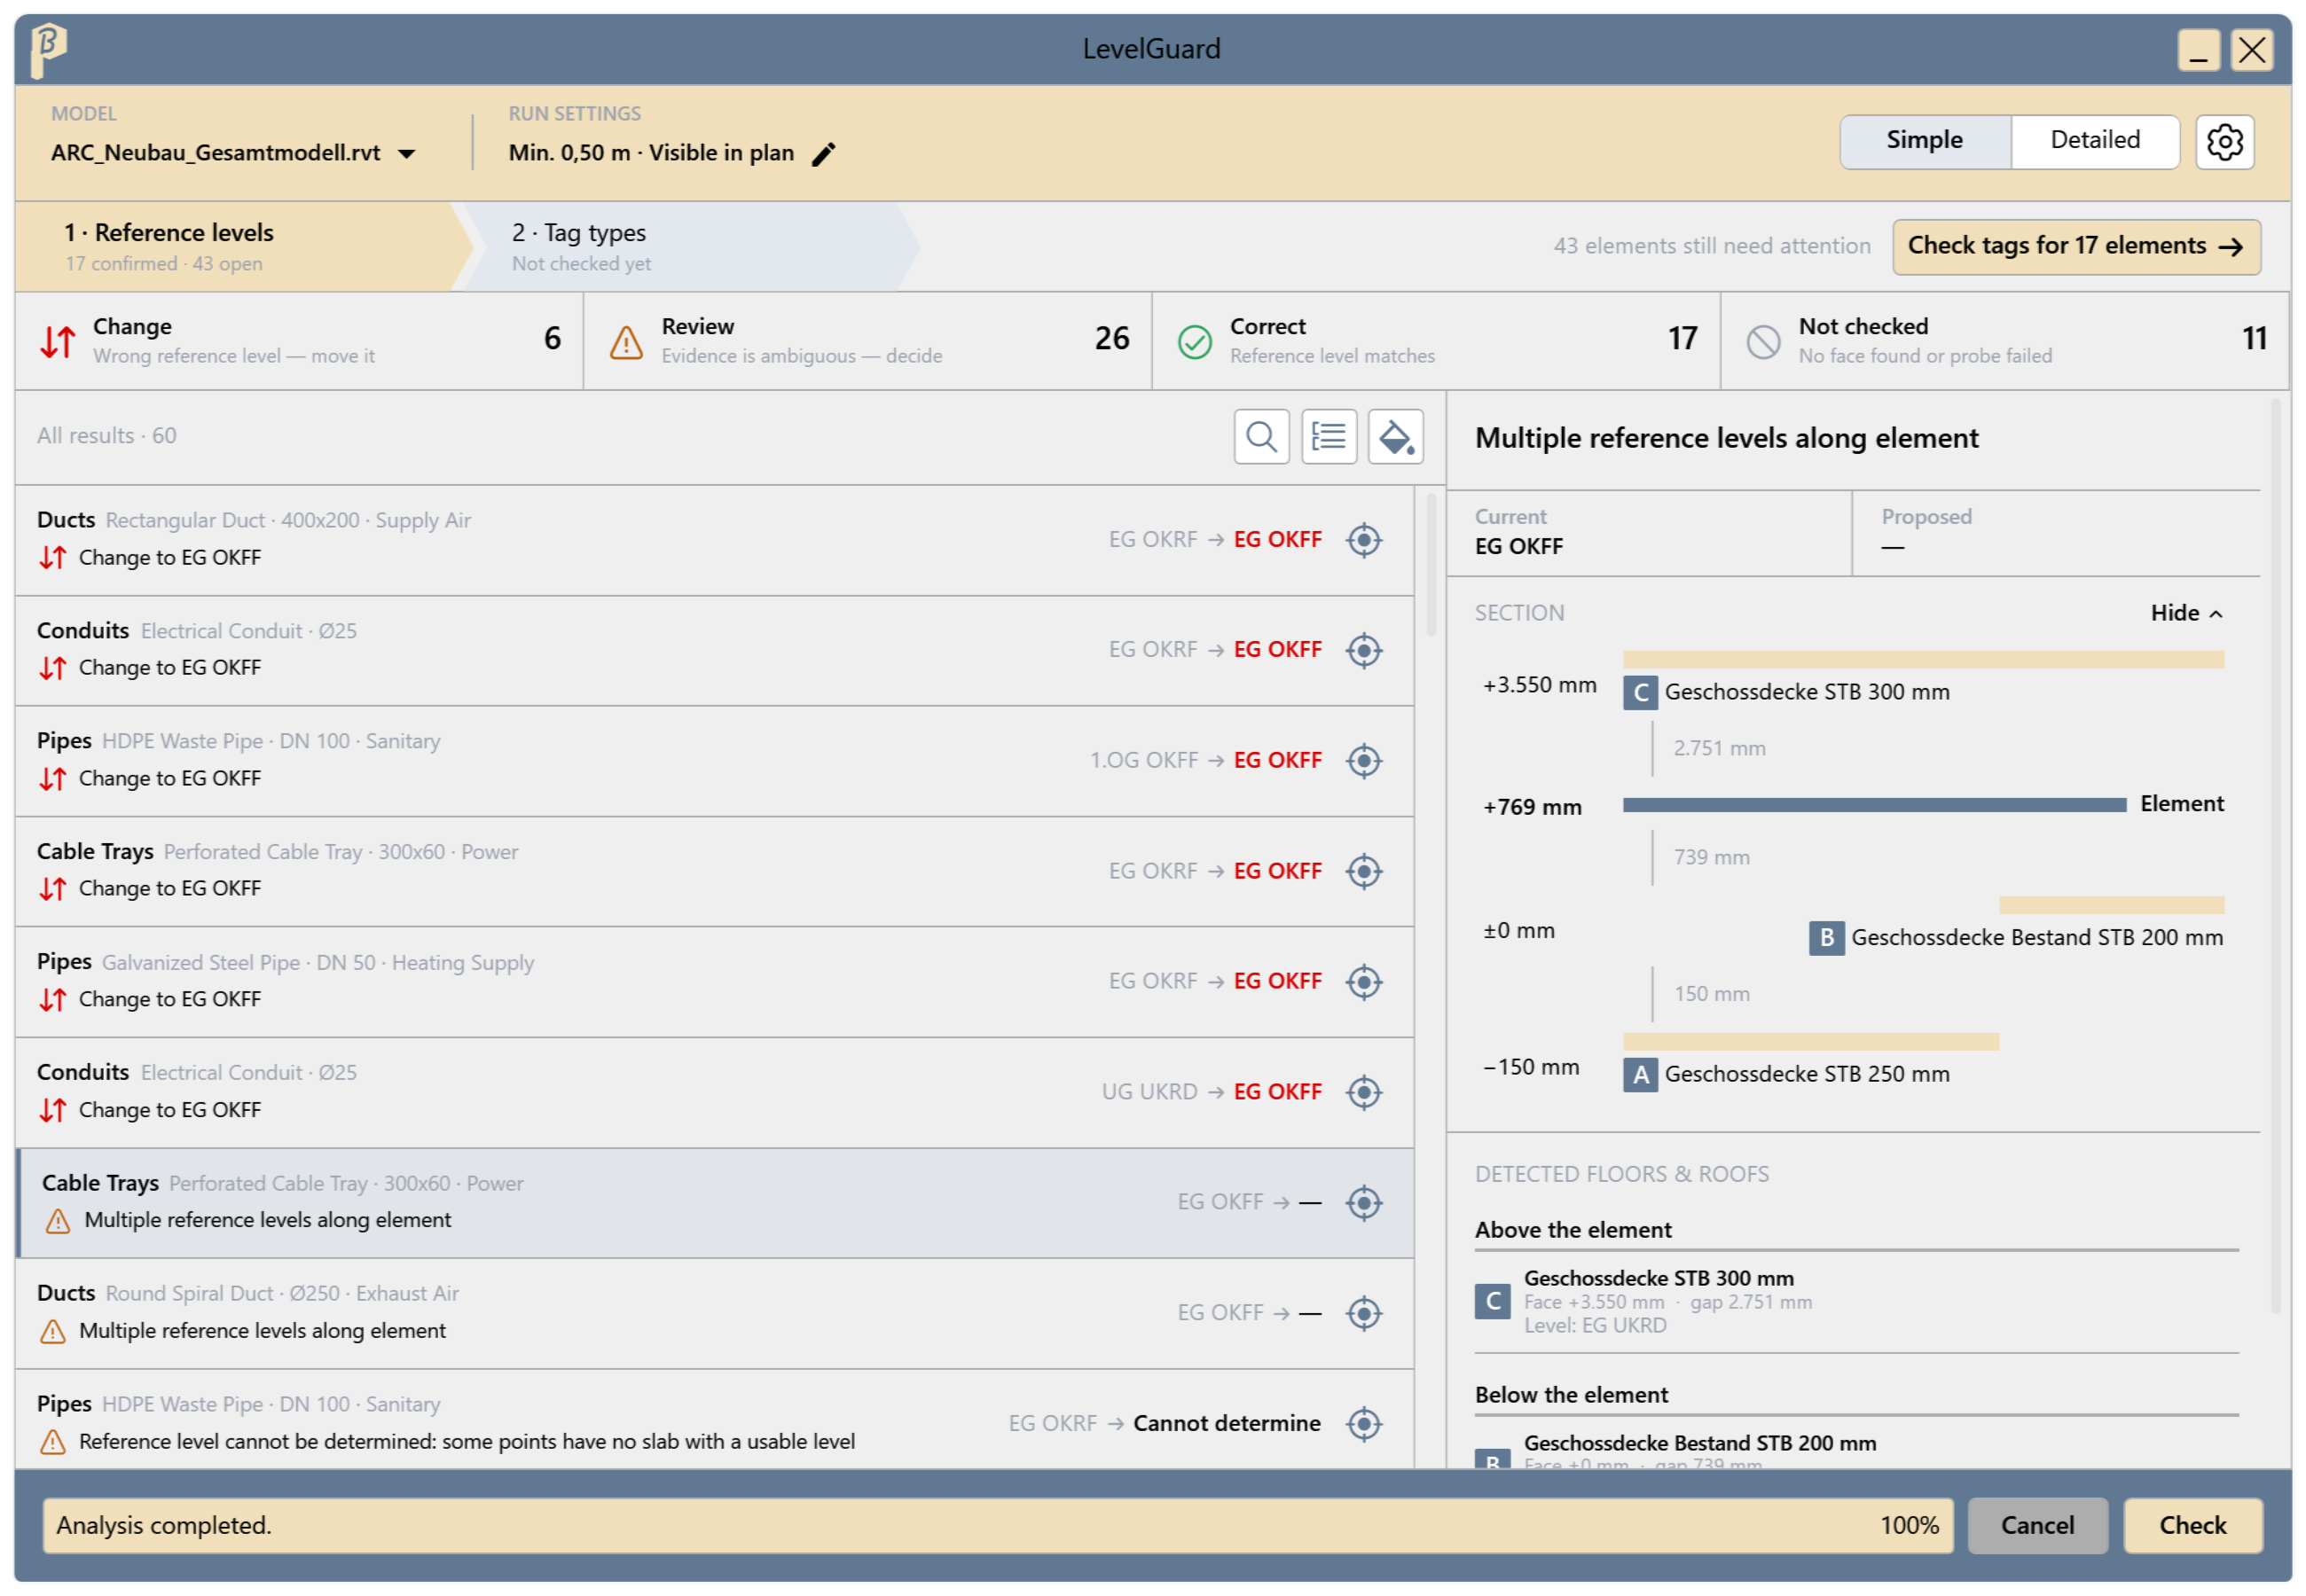
The window stays open next to Revit. At the top are the model, run settings and mode, below them the two steps, the result groups, on the left the result list and on the right the details of the selected result.
Simple or Detailed?
Both modes check the same elements with the same rules. They differ in how they treat surfaces that are not suitable as a reference, for example gratings, ramps or shaft covers.
| Simple | Detailed | |
|---|---|---|
| Surfaces without a matching level | are skipped automatically | are checked until they are ignored |
| Ignore list | not used | Ignore per surface, saved per linked model |
| What for | checking whether the elements reference the right level according to the project rules | the same, plus: floors without a matching level are reported instead of skipped, which shows whether all required levels are defined |
How elements are checked
LevelGuard sorts the elements into element groups. Each group has a fixed Measuring point and a reference rule, which is chosen in the project settings.
| Element group | Measuring point | Default rule |
|---|---|---|
| Pipe | Pipe axis (RA) | By height |
| Sloped pipe | Pipe invert (RS) | Always OKFF |
| Duct | Bottom (UK), top (OK) for the upper slab | By height |
| Round duct | Axis (RA) | By height |
| Cable tray | Bottom (UK) | By height |
| Conduit | Axis (RA) | By height |
Reference rules
- By height: what counts is the distance from the measuring point to the top of the structural slab below.
- Up to the Height threshold (2.00 m by default): the element references its own storey, i.e. its OKRF or OKFF level, whichever is active for tagging.
- Above it: the element references the slab above (UKRD level).
- Example: a pipe with its axis 0.80 m above the structural slab gets the storey's OKFF, a pipe 2.60 m above it gets the UKRD of the slab above.
- For ducts, the bottom always counts for this decision, even if the duct is then referenced to the slab above by its top.
- Always OKRF, Always OKFF, Always UKRD: the group always references this reference type.
Reference types of the levels (German abbreviations, used as values of MP_400_Referenztyp)
- OKRF (Oberkante Rohfußboden): top of the structural floor of the slab below.
- OKFF (Oberkante Fertigfußboden): top of the finished floor of the slab below.
- UKRD (Unterkante Rohdecke): underside of the structural slab above.
Not checked are vertical elements, elements shorter than Min. length and elements not visible in the floor plan. The line above the result list says how many there are of each.
Set up the project settings
The settings apply to the whole project and are saved in the project. Open them in the LevelGuard window with the gear.
Levels page: turn on the levels elements may reference (Use for tagging) and choose the Reference type for each level. Only active levels are proposed as a reference. The colored dot shows the kind of level: main level, storey level or auxiliary level.
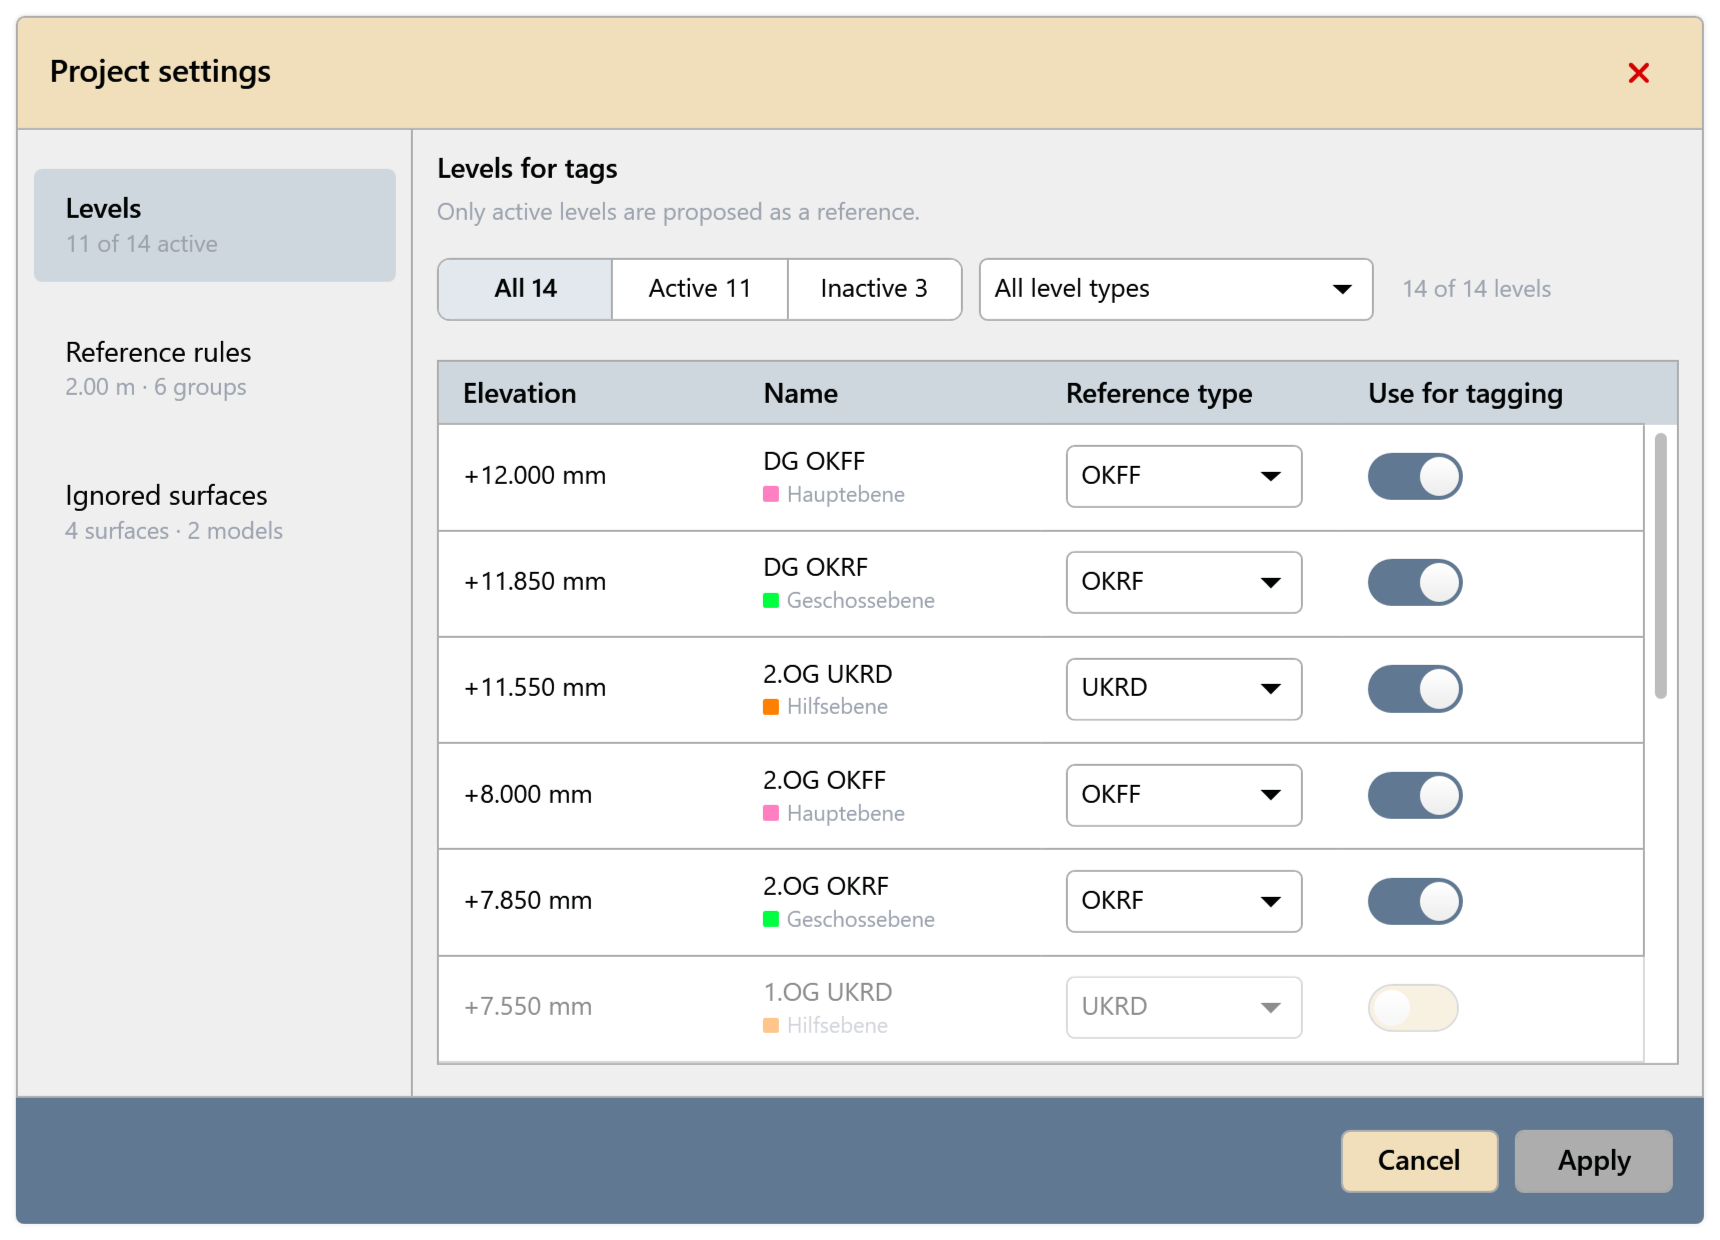
Fig. 2 · Project settings, Levels page Reference rules page: set the Height threshold and the rule for each element group.
- Height threshold: 0.50 m to 10.00 m, 2.00 m by default. It applies to all groups set to By height; the sketch on the right shows it between the lower and upper slab.
- Rule per element group, the choices are:
- By height (2.00 m): up to the threshold the own storey (OKRF or OKFF), above it the slab above (UKRD). The number shows the current threshold.
- Always OKRF: always the storey's structural floor level.
- Always OKFF: always the storey's finished floor level.
- Always UKRD: always the underside of the slab above.
- The Measuring point is shown below the group name and is fixed; it cannot be changed. More under How elements are checked.
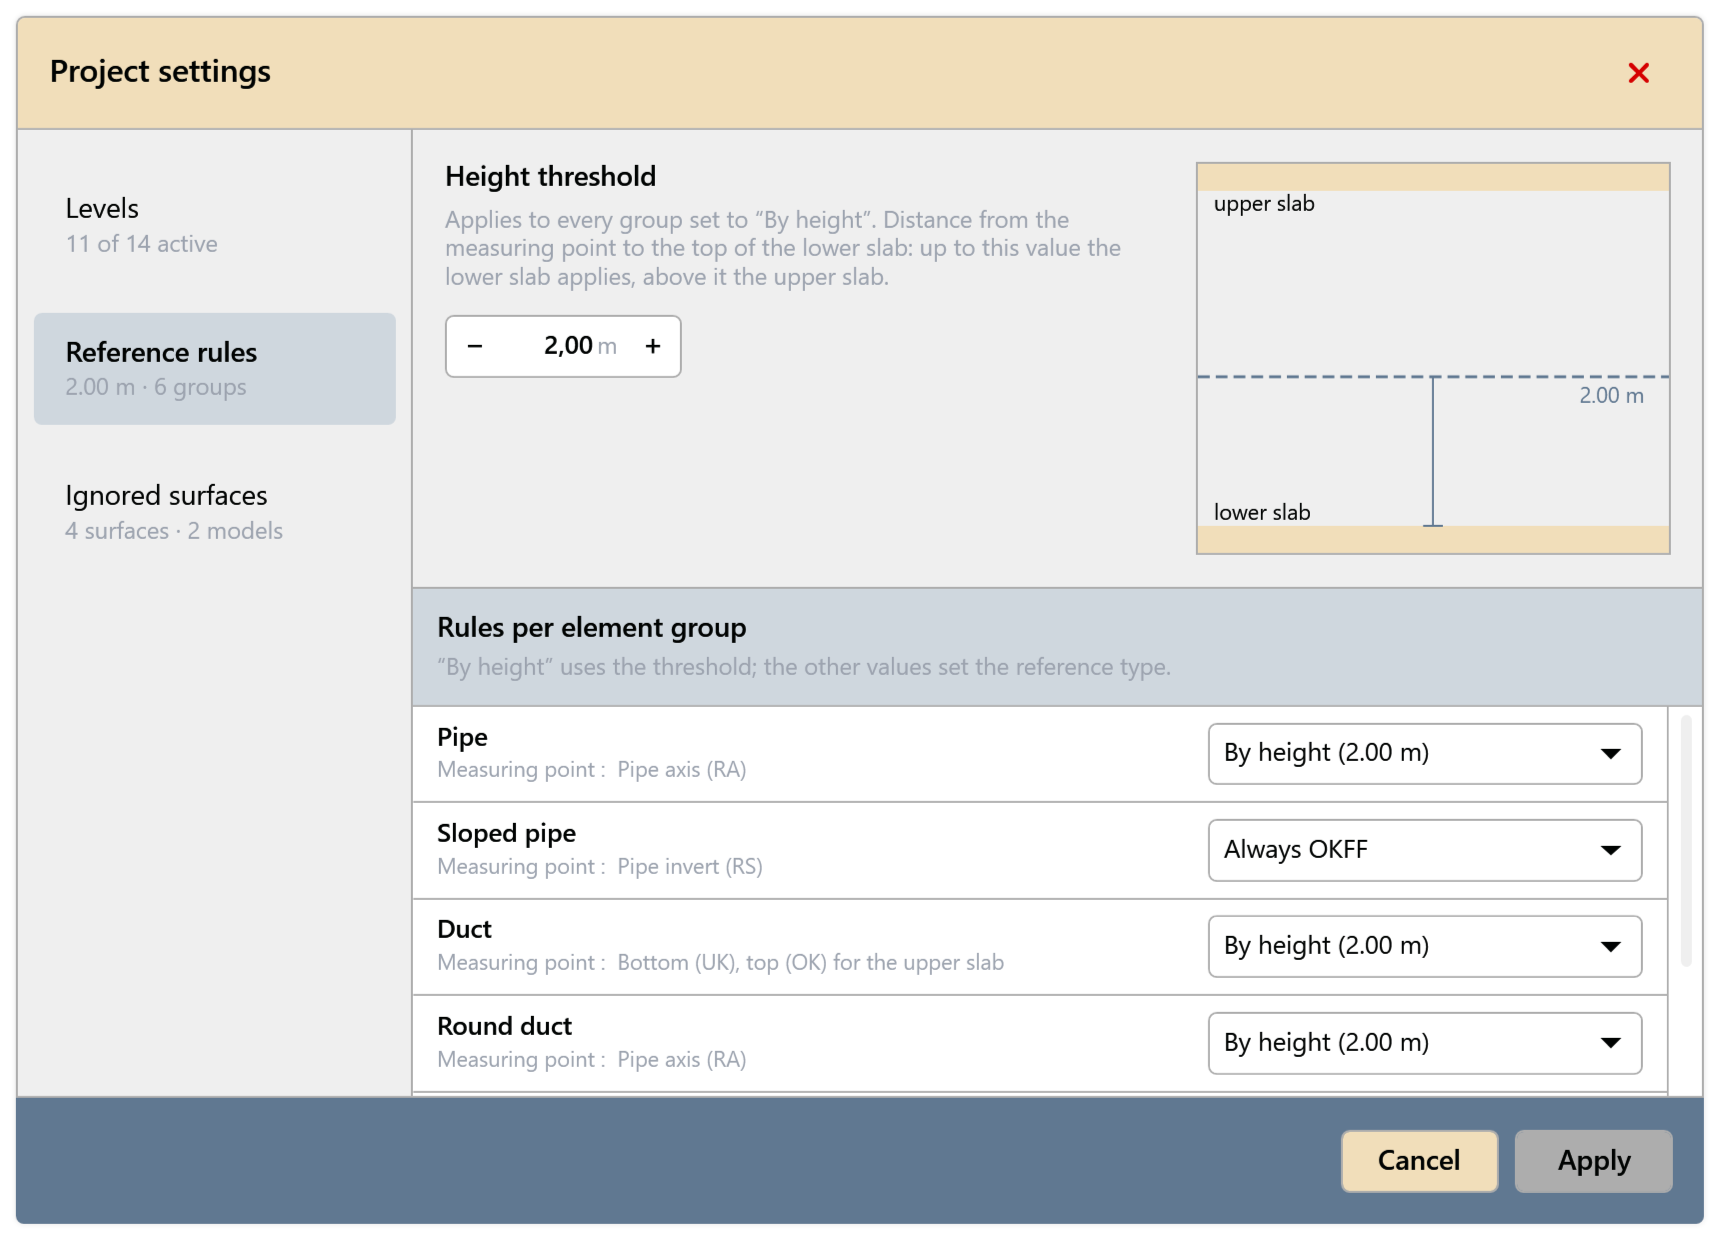
Fig. 3 · Project settings, Reference rules page Ignored surfaces page (used in Detailed mode only): view ignored floors and roofs per linked model and bring them back with Consider again.
Click Apply. The dialog shows open changes as “… unsaved change(s)”.
Read the results
Fig. 1 shows where each area is in the window.
Result groups (Fig. 1, no. 6): each tile shows the count. Click a tile to filter the list to that group; click again to clear the filter.
Group 1 · Reference levels 2 · Tag types Change Wrong reference level — move it Wrong tag type, change it Missing – No height tag in this view Review Evidence is ambiguous — decide Tag not unique, decide Correct Reference level matches Tag type is correct Not checked No face found or probe failed Tag could not be checked Result list (no. 8): click a row to see in the Details on the right (no. 9) why the element was flagged. The target icon at the right edge of each row (Show in Revit) selects the element in the model.
The three icons above the list (no. 7), from left to right:
Magnifier, Search: filters the list by element ID, category, type, size, system, level or message text.
List icon, Group by: opens a menu with None, Category, System type and Pipe/duct type.
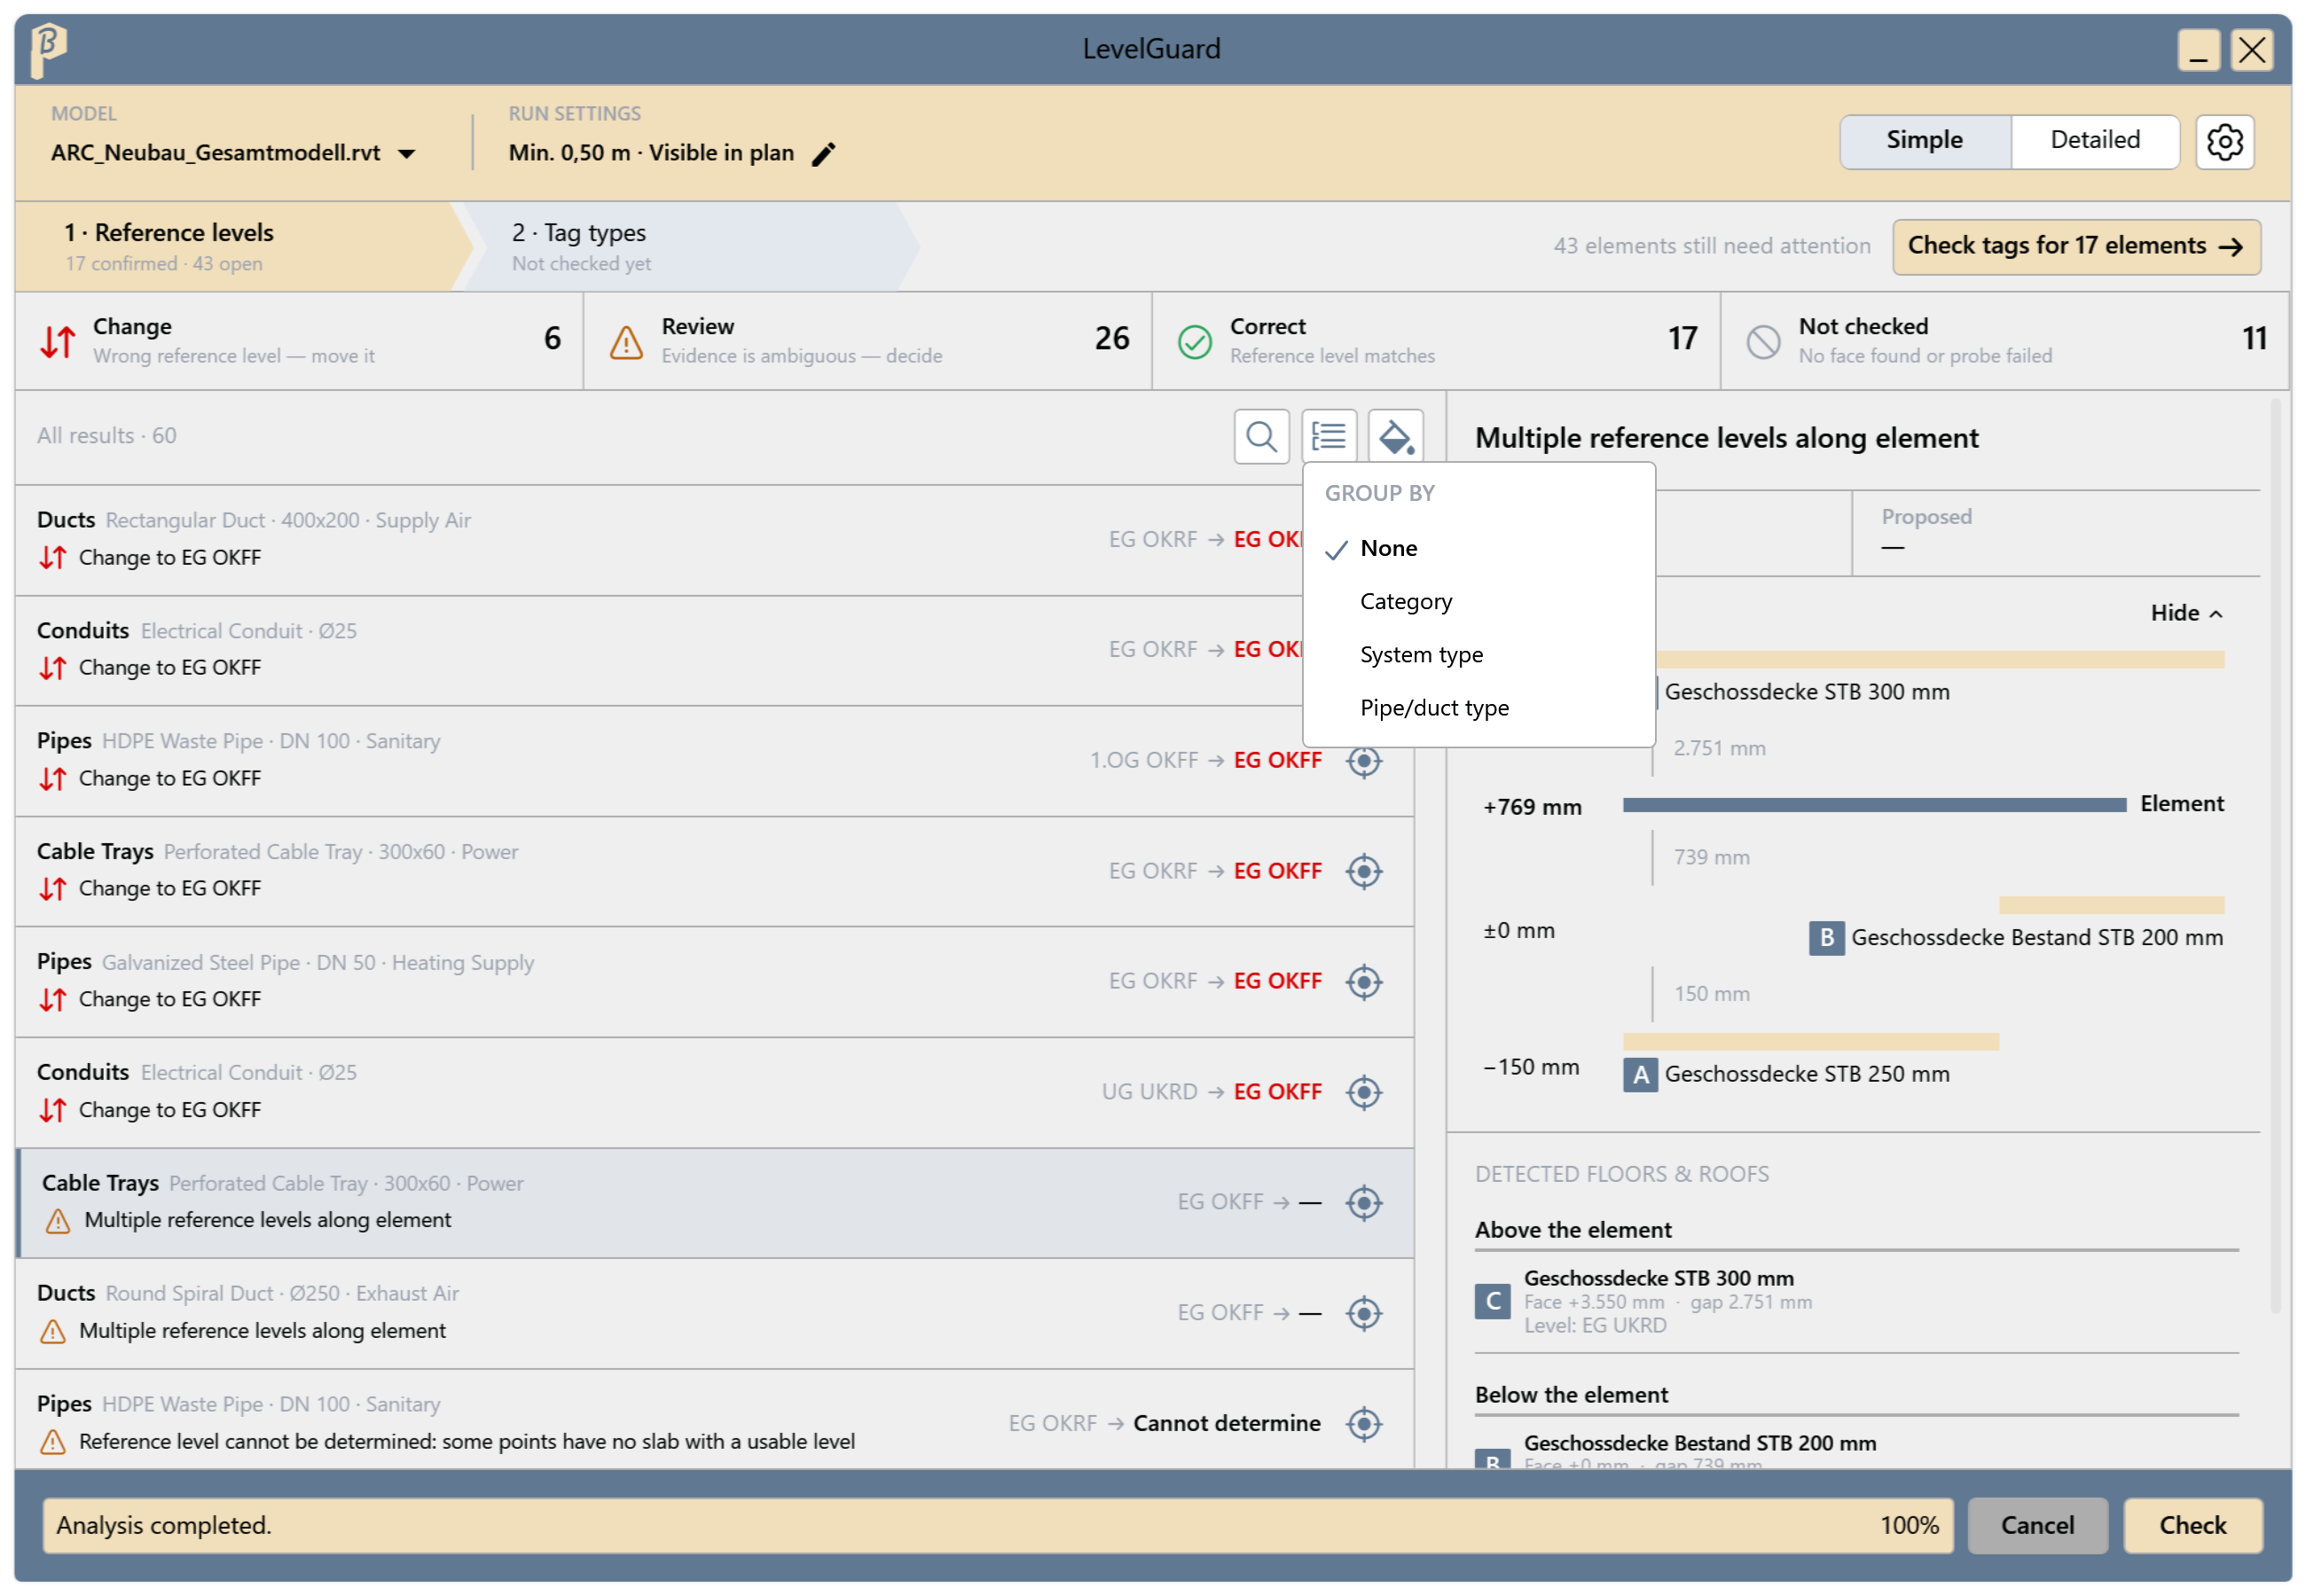
Fig. 4 · Group by menu Paint bucket, Color in view: colors the elements in the active Revit view. Status colors each result in its group's color, Target level (step 1) or Change to (step 2) uses one color per target; Off removes the colors. Keep colors in other views keeps the colors when you switch views.
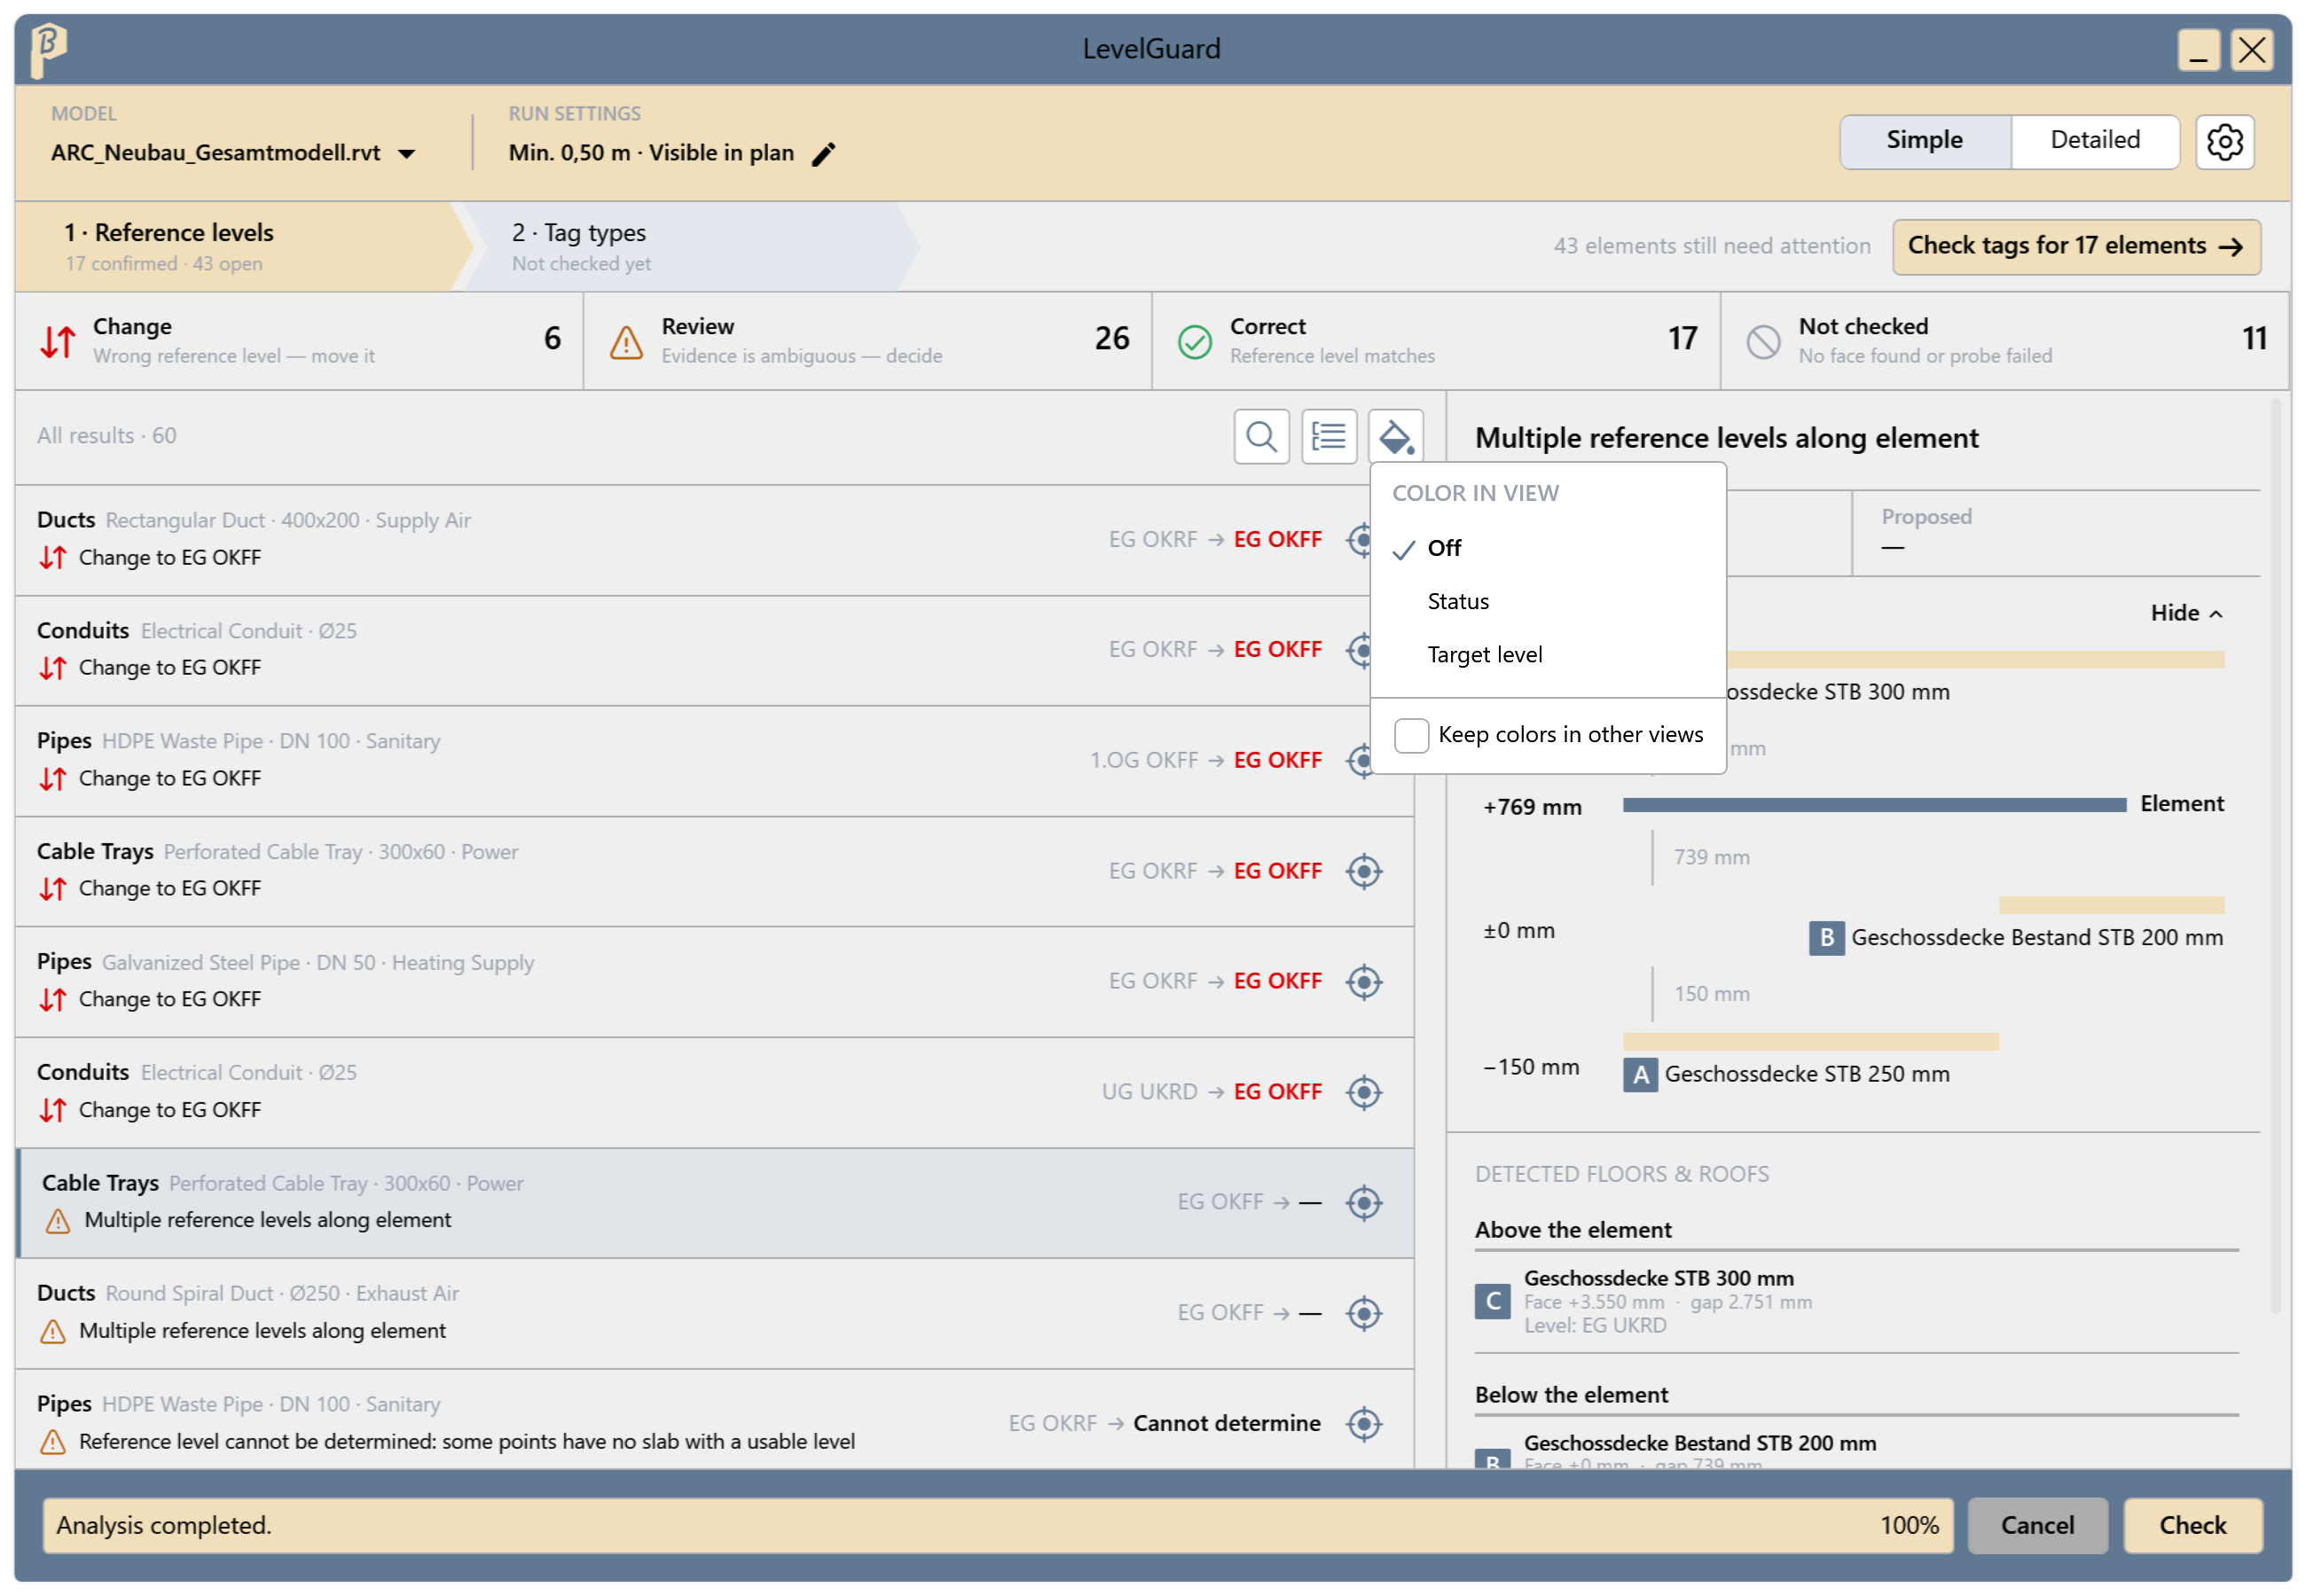
Fig. 5 · Color in view menu
If the mode, Min. length, “Selection only”, the linked model, the ignore list or the project settings change, the message Results out of date appears at the bottom right above Check. Check now runs the check again, Later hides the message.
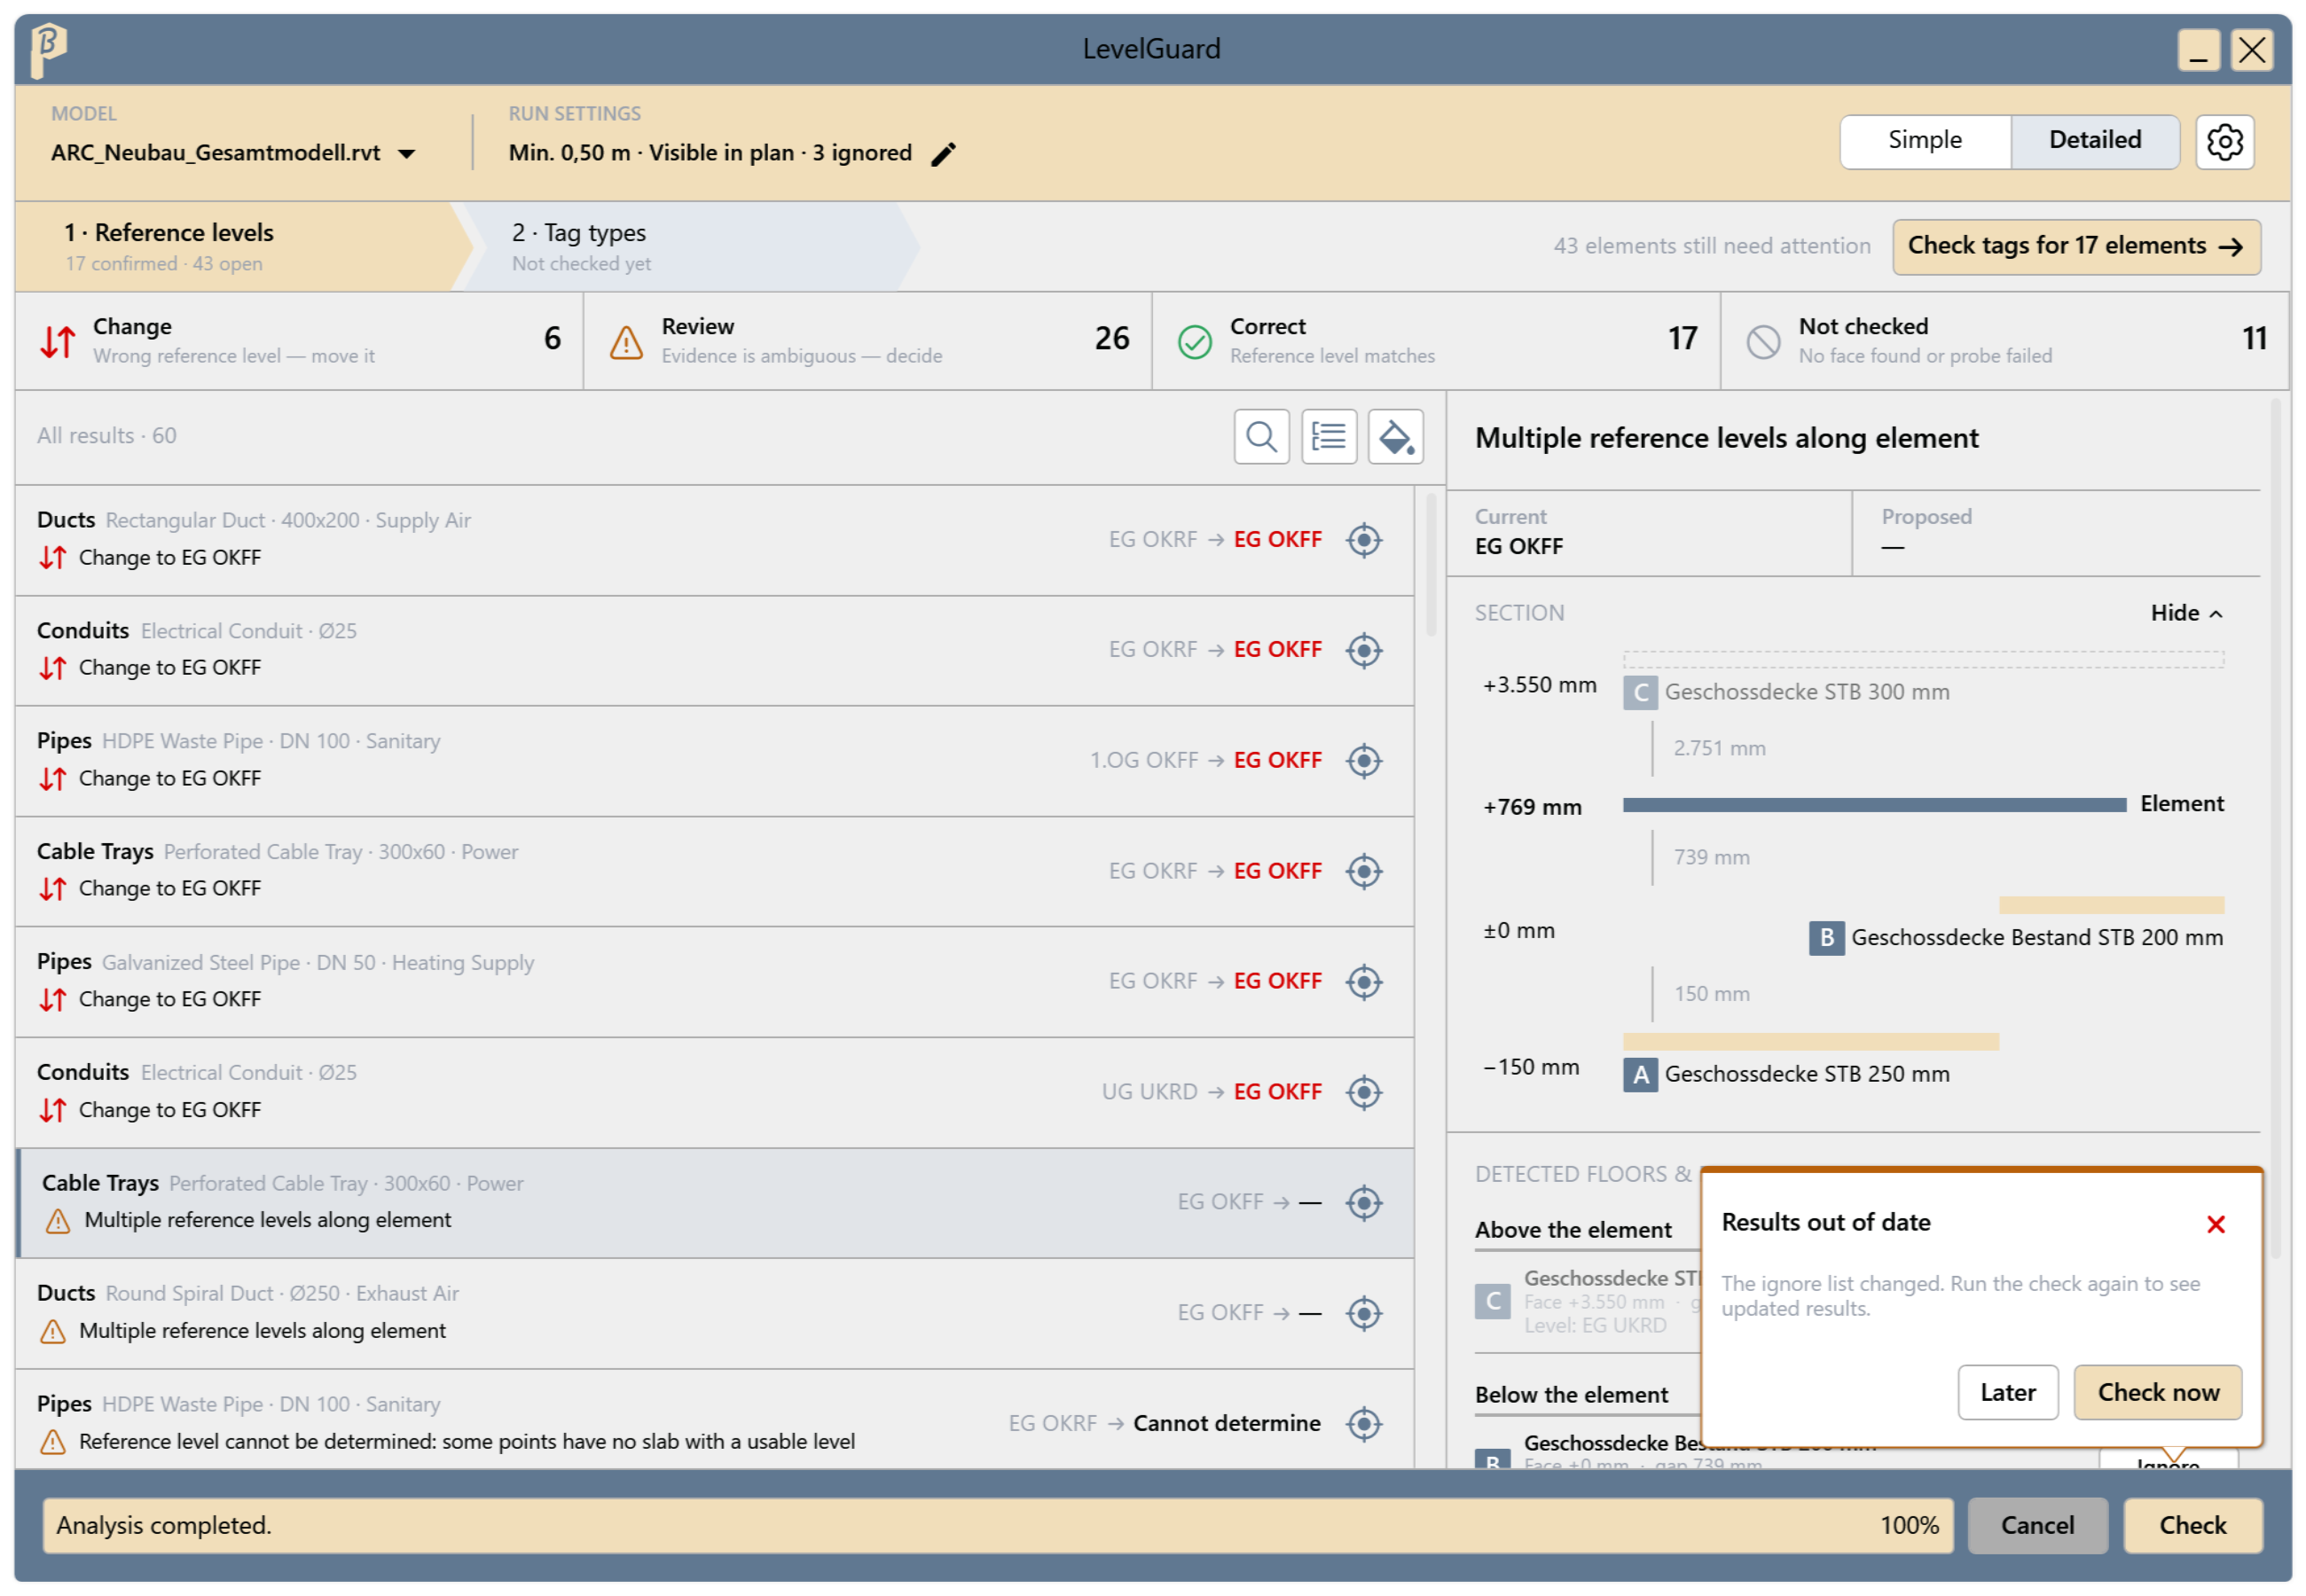
Fig. 6 · Results out of date message at the bottom right
Messages in step 1
Each row of the result list shows a message below the element. On the right is the current level and, after the arrow, the level the project rules require; if none can be determined, it shows Cannot determine or New level at ….
| Message | Group | Meaning | What to do |
|---|---|---|---|
| Change to … | Change | The element references a different level than the project rules require. | Move it to the named level in Revit. |
| Reference level correct | Correct | The reference level matches the project rules. | Nothing; the element goes on to step 2. |
| No valid reference level found at Z … (right: New level at …) | Review | A slab was found, but there is no active level with a matching reference type at its height. | Create a level at this height or turn it on in the project settings. If the surface should not be a reference: ignore it in Detailed mode. |
| Multiple valid reference levels found | Review | There are several active levels with a matching reference type at the slab's height. | In the project settings, leave only one of them active for tagging. |
| Multiple reference levels along element | Review | The element runs over slabs that belong to different levels, e.g. across a step in the slab. | Split the element at the boundary and move each part. |
| Variable slab-face elevation | Review | The slab under the element is not the same height everywhere, e.g. with a slope or steps. | Look at the SECTION to see which level is meant and decide by hand. |
| Reference level cannot be determined: some points have no slab with a usable level | Review | Under part of the element there is no slab with a matching level, e.g. over an opening or at the slab edge. | Check the SECTION; split the element or add the missing level. |
| No … level at the slab face, check the rule or the level settings | Review | The element group's rule requires a reference type that no level at the slab's height has. | Change the group's rule or turn on a level of this type (project settings). |
| Height rule changes along the element, split it or set the rule | Review | With By height, part of the element is below and part above the height threshold. | Split the element or choose a fixed rule for the group. |
| No slab face found below | Not checked | No floor was found below the element. | Check whether there is a floor in the architectural model there. |
| No slab underside found above | Not checked | The element should reference the slab above, but none was found there. | Check the slab above in the architectural model or change the rule. |
| No floor or roof found along the element | Not checked | There is no surface above or below the element. | Check the element's location and the linked model. |
| Check Failed | Not checked | An error occurred for this element. | Check again; if it persists, send the log to support. |
| Unsupported location | Not checked | The element has no location LevelGuard can evaluate. | Check it by hand. |
In Simple mode, surfaces without a matching level are skipped, so No valid reference level and New level at … appear mostly in Detailed mode.
Check height tags
Click Check tags for … elements. LevelGuard checks the height tags only of elements whose reference level is Correct in step 1; the number in the button says how many. Move elements in Change, Review or Not checked in Revit first and check step 1 again; then they are included in step 2.
For each result, the list shows what to do (numbers in Fig. 7):
- Change the tag type to … (no. 2): the measuring point or reference of the type does not match the element. On the right is the current type and, in red, what it should name.
- Add a height tag in this view (no. 3): the element has no height tag in the active view; group Missing.
- … height tags on this element, keep only one (no. 4).
- Tag type does not name a measuring point and reference (no. 5): the type name and tag must name the measuring point (RA, RS, UK, OK) and reference (OKRF, OKFF, UKRD).
- Type name does not match the tag content (no. 6): usually a copied type that was not renamed.
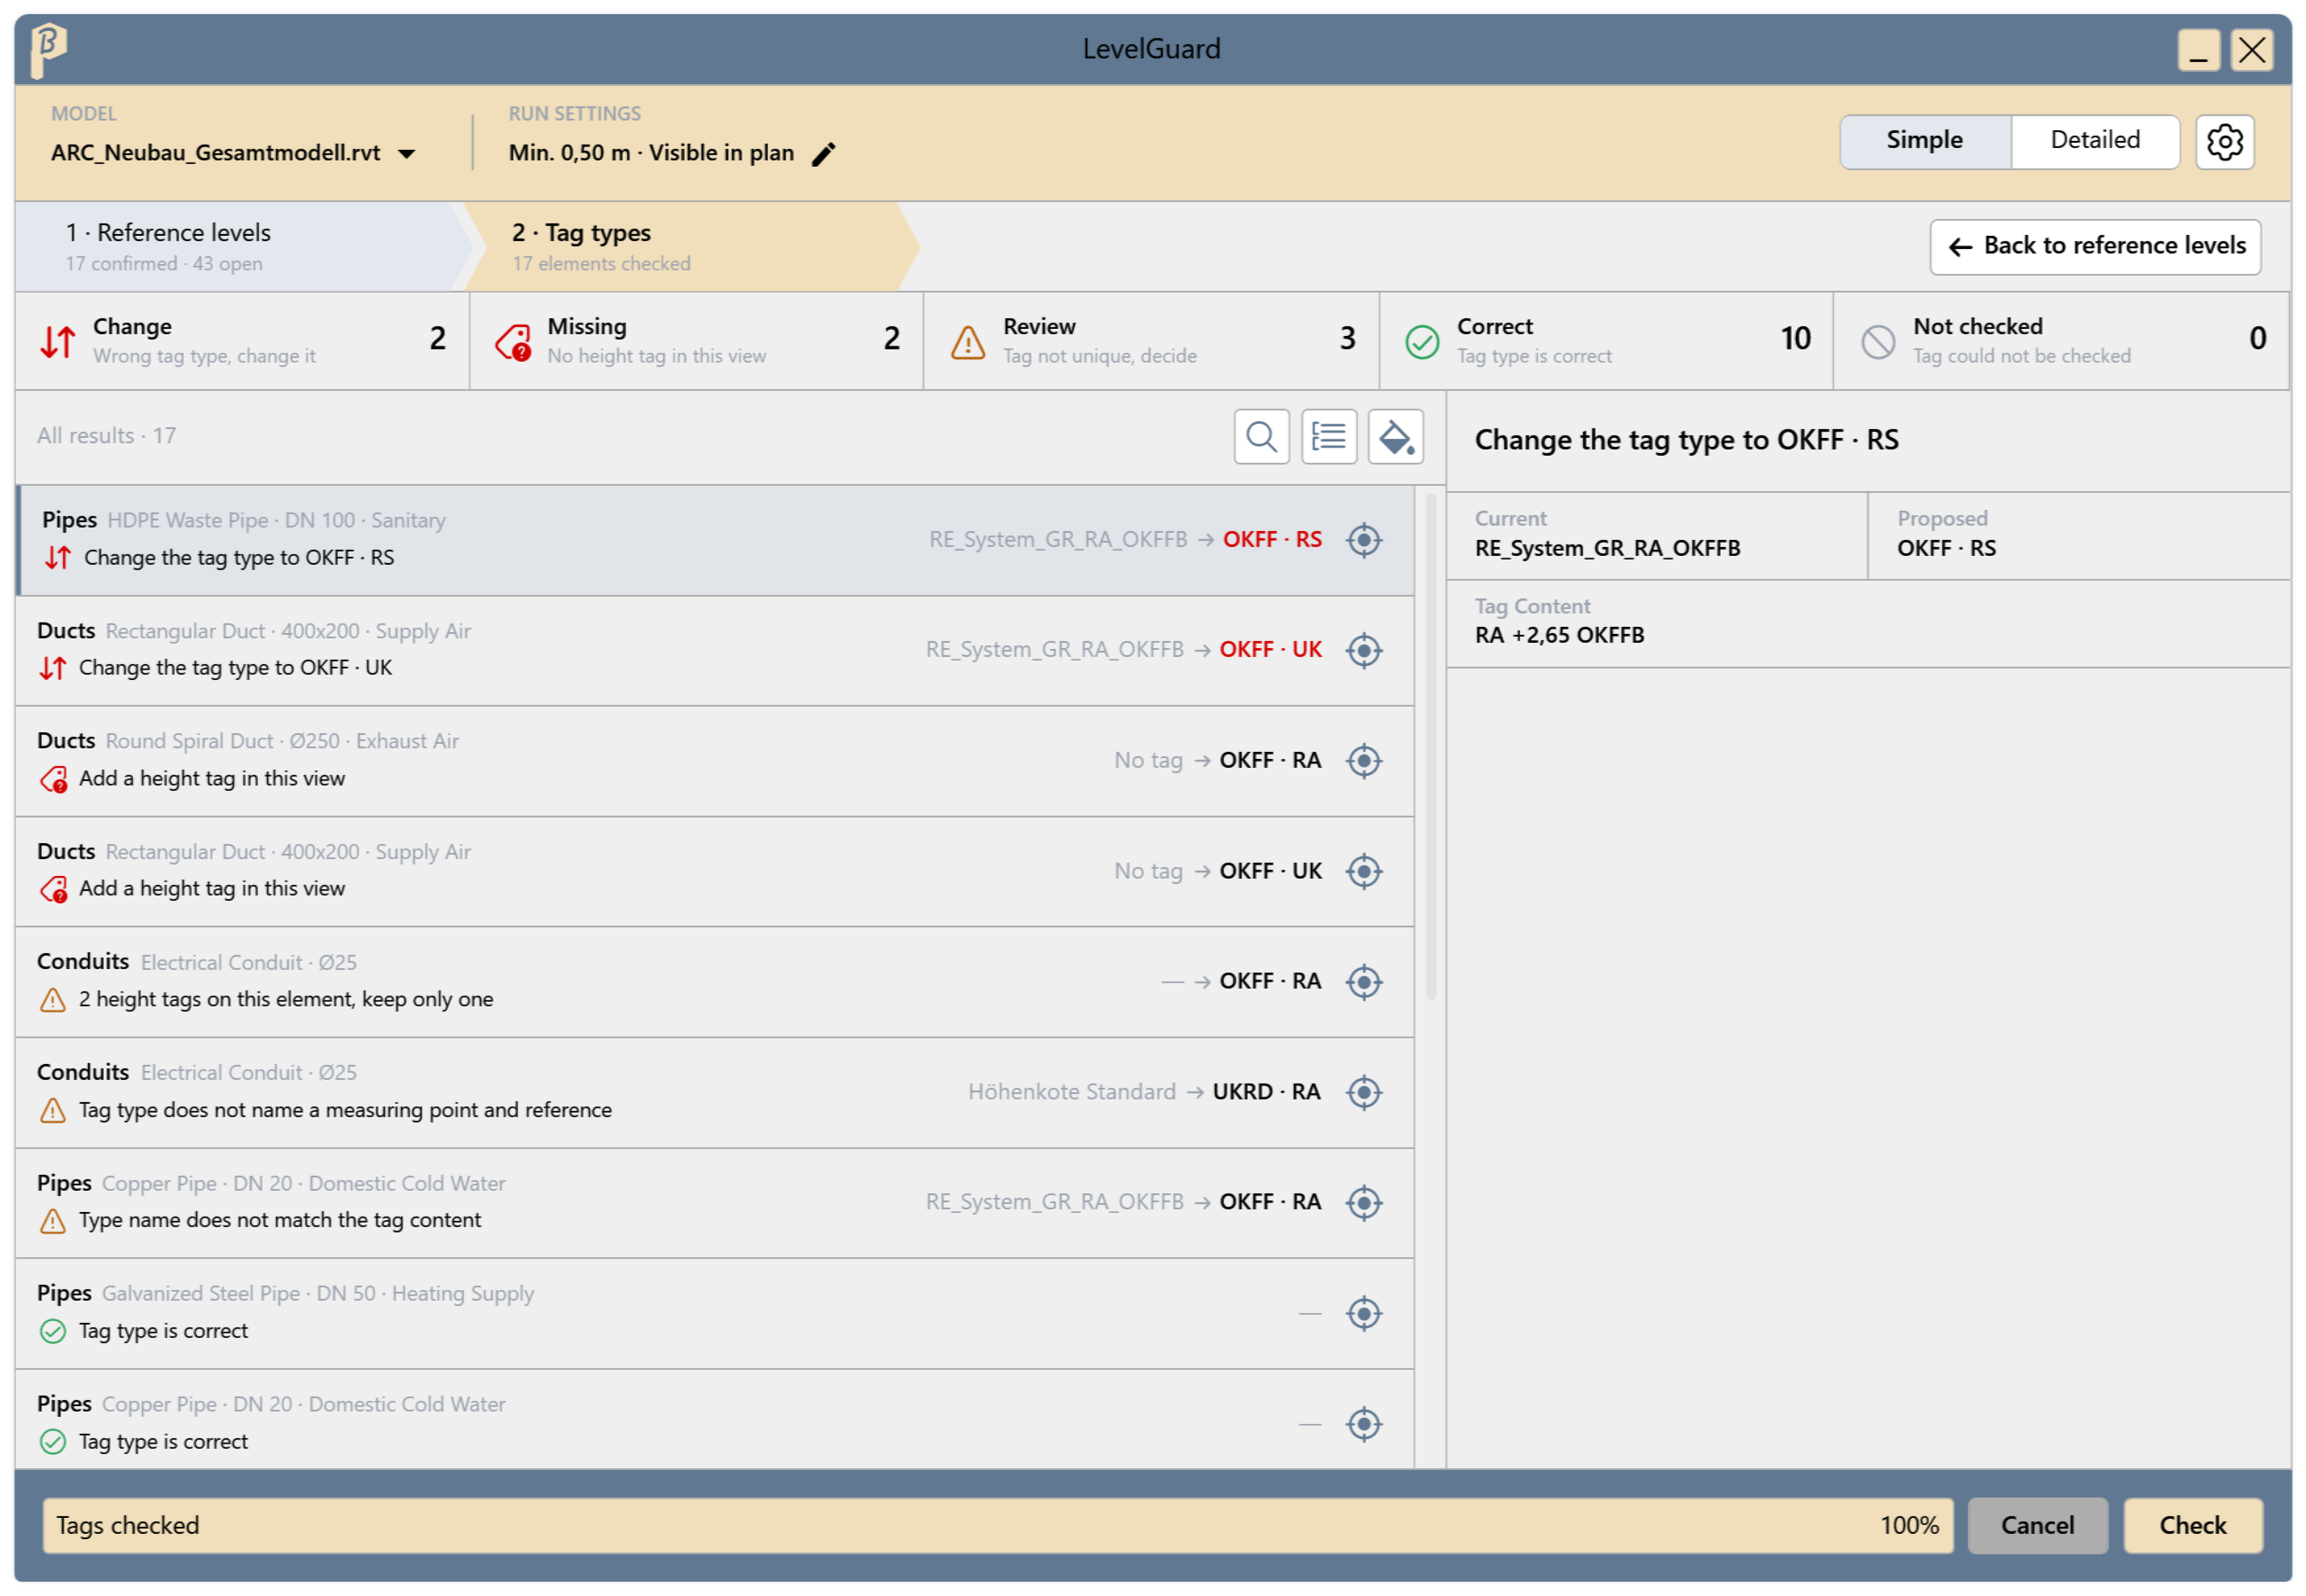
Fig. 7 · 2 · Tag types Back to reference levels (no. 7) switches the list back to step 1.
Limitations
- LevelGuard does not change elements or tags. It shows what to change; you move the elements in Revit.
- During the check, LevelGuard creates a temporary view and removes it afterwards. Saving, synchronizing and closing are blocked during that time.
Common problems
“LevelGuard requires an active floor plan.”
Open a floor plan and start LevelGuard again.
“No loaded linked documents were found.”
Link the architectural model, or reload it in Manage Links.
“The selected linked document resolves to … loaded instances; exactly one is required.”
The model is placed more than once. Remove the extra instances or choose a model with exactly one instance.
“The level parameter … does not exist in this project.”
Add the named parameter to the Levels category (MP_400_Referenztyp as Text, MP_400_Beschriftungsebene as Yes/No) and start LevelGuard again.
“No … level at the slab face”
The element group's rule does not match the project's levels. On the Levels page, turn on a level with this reference type at the slab's height, or change the rule.
“Height rule changes along the element”
Part of the element is below and part above the height threshold. Split the element or choose a fixed rule for the group.
“The save, synchronization, or close was cancelled.”
LevelGuard was still cleaning up. Wait a moment and try again.